Setting up AirFader to talk to your console is not difficult, but paying special attention to network setup will make things much easier later.
These instructions will help you determine your network router's current network configuration, so you can avoid making changes to the network itself. If you have not set up your wireless router, please follow their directions for a typical setup. Be sure to enable security for your WiFi network. If someone can connect to your WiFi network, they can access your console with or without AirFader!
Connect your network
- Connect your Windows computer to your wireless network router, either via WiFi or CAT5 cable.
- Connect your audio console to the router using a CAT5 cable.
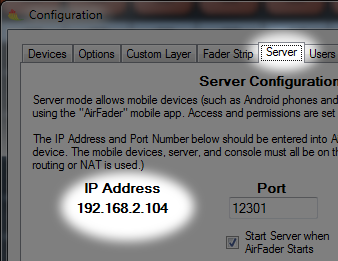
- Open AirFader, click Config, and choose the Server tab:

- Note the IP address which is normally assigned by your router (via DHCP). The first three sets of numbers are your "network prefix." The last number identifies your specific device. In this example the network is "192.168.2" and the computer is "104". It is okay if your prefix is different as long as all your devices have the SAME network prefix and DIFFERENT final number. Your router will handle most of this for you automatically but we need to know so we can set up the console.
Configure the console

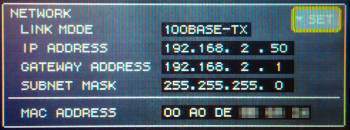
- Enter the network setup on your console:
- LS9: Setup --> Misc Setup --> Network --> SET
- M7CL: Setup --> NETWORK
- Set the IP ADDRESS so that it begins with the network prefix you discovered earlier, and ends with a unique number. Routers usually use a specific range for automatic addresses, like 2-100 or 100-250, so if your computer has a high number, give the console a low number... or if your computer has a low number, give the console a high number. (But never use "1" or "255".) This way you can avoid another device getting the same address as the console.
- Set the GATEWAY ADDRESS to be your network prefix with "1" as the last number.
- Set the SUBNET MASK to be exactly "255.255.255.0".
- (MAC ADDRESS can't be changed and is unique for every console made.)
Install the Yamaha DME-N Network Driver
- Visit the Yamaha website:
http://www.yamahaproaudio.com/global/en/downloads/firmware_software/networkdrivers/ - Select "Network Driver V1.2.3 for Win"
- Agree to the license agreement and begin the download.
- Open the ZIP file, then the "dme_nwd123_win" folder, and double-click to run "setup.exe"
- Follow the steps to install the driver. (There are no options to change.)
- Restart the computer. You must do this or the DME service won't start and AirFader will not work.
Configure the Yamaha DME-N Network Driver

- Open the DME-N setup from Windows Control Panel
- Windows XP/Vista/7
- Click the Start Menu and choose Control Panel
- Click "Switch to Classic View" in the top left of the window, or type "DME" in the Search Bar
- Double-click the "DME-N Network Driver" icon
- Windows 8
- Go to the Start Screen and start typing "DME"
- Click "DME-N Network Driver" from the search results
- Windows XP/Vista/7
- Click "Advanced Settings" which is actually the easiest method.
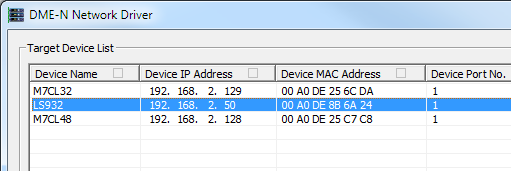
- Enter your console's IP ADDRESS in both the "Detect From" and "Detect To" boxes.
- Click "Start"
- Your console should immediately show up in the list. Click to select the console, and click "Add To Device List"
- The new device will have a generic name like "UNIT1". Click to select it.
- Change the name in the "DEVICE NAME" box to something helpful like "LS932" or "HOUSE M7CL"
- Click "Apply"
- Click "Save and Close". We're almost done!
Configure AirFader

- Open AirFader
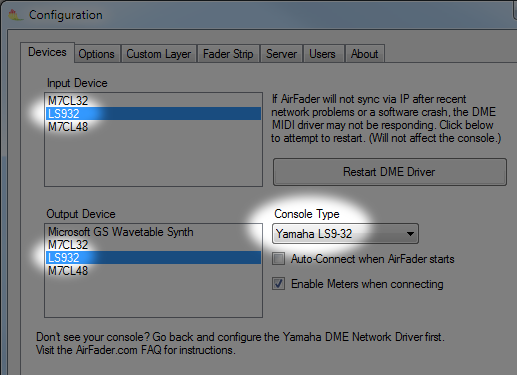
- Click "Config" and choose the "Devices" tab
- Select your console in BOTH the "Input Device" and "Output Device" sections
- Select the proper "Console Type" from the drop-down box
- Done!
- Go to the "About" tab and enter your license key if you haven't already, and then click "Save" followed by "Connect" to test it out!
